In you Form.php integrate the code to get editor Wysiwyg
$fieldset->addField('field_name', 'editor', array(
'name' => 'field_name',
'label' => Mage::helper('Module_Helper_Name')->__('field_name'),
'title' => Mage::helper('Module_Helper_Name')->__('field_name'),
'style' => 'width:700px; height:500px;',
'wysiwyg' => true,
'config' => Mage::getSingleton('Module/wysiwyg_config')->getConfig(),
));
Now dont forget to add the WYSIWYG foder from the cms/model to your model folder
Tuesday, March 22, 2011
Sunday, March 20, 2011
How to create Configurable Products in Magento
Magento offers two options to create configurable products (products with options such as Size or Color):
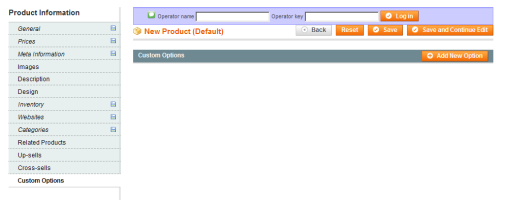
1. Simple products with custom options:
a) Create Simple Product

 d) Add a new option and add your own custom option. Our example is for Size.
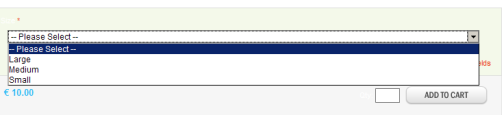
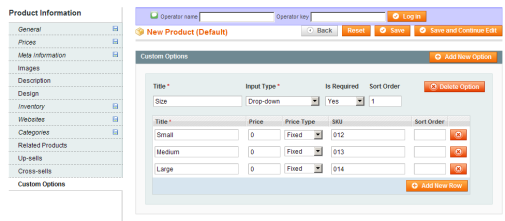 e) Save the product and that is all. Your product must show your custom option on the front end.
 2) Create a configurable product and associate simple products to it.
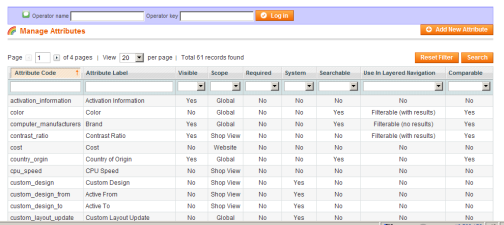
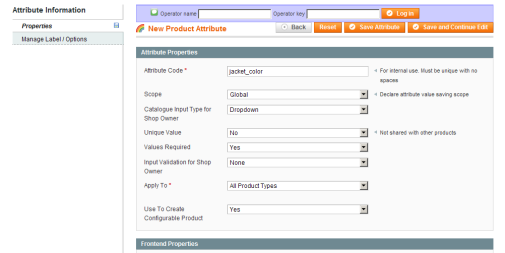
a) First you must create the attributes (make sure it can be used for configurable product)
To create an attribute log in your admin control panel select Catalogue => Manage Attributes => Create new attribute.
 b) Our attribute code in this example is for Jacket Color.
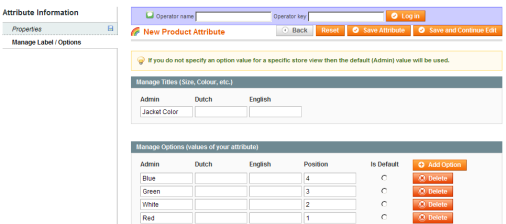
 c) Add label options and save the attribute.
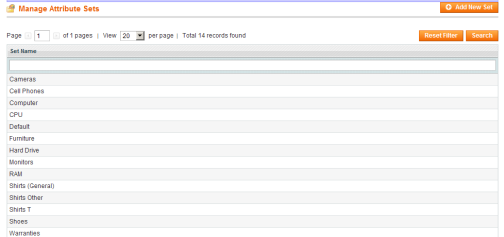
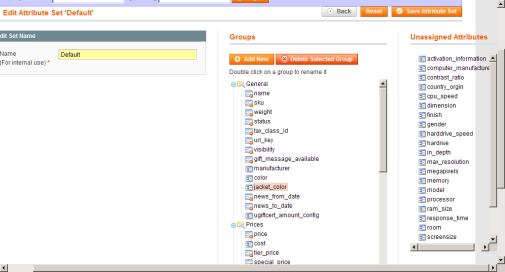
 d) Manage attribute set to default
To manage the attribute set log in your admin control panel select Catalogue => Manage Attributes => Manage Attribute Set.
 e) Move the attribute created (in our case jacket color) to default attributes. You can easily move it, just drag and drop it, exactly where you want to display it.
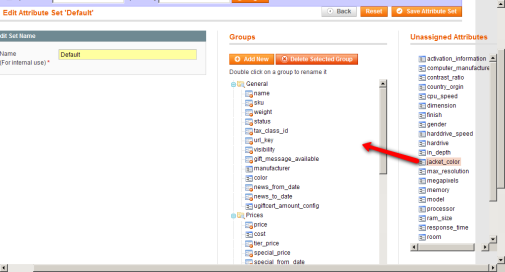 f) Moved under default fields and save the attribute set.
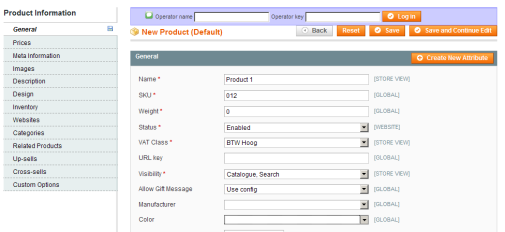
 g) Create the simple products and fill in the attribute. It is not required to add images, description. Set visibility to nowhere & save the product.
To create simple products log in your admin control panel select Catalogue => Manage Products => Create new product.
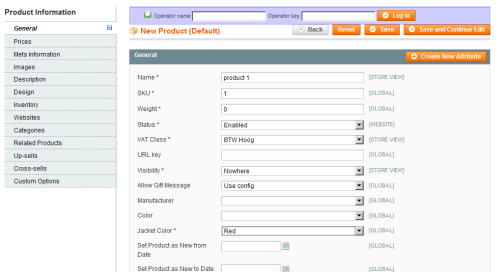 In our case we have our Jacket Color attribute in 4 colors: Red, Green, White, and Blue. We now have to create a simple product for each color. In total there will be 4 simple products. We can duplicate the products to make the process faster. (Just use a different Product name, Sku & Jacket Color.)
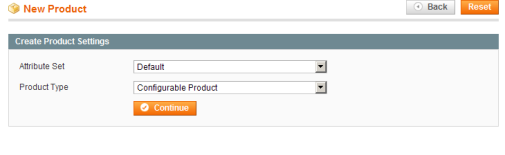
h) Once all simple products are done, we can create 1 configurable product for it.
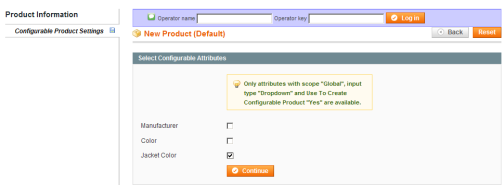
 i) In this example Configurable Product uses Jacket Color and therefore the box (for Jacket Color) is checked.
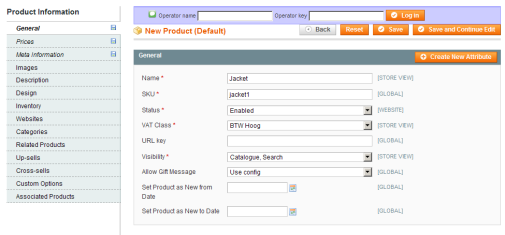
 j) Create the configurable product and fill in all the dates required such as general, description, images, websites, and categories.
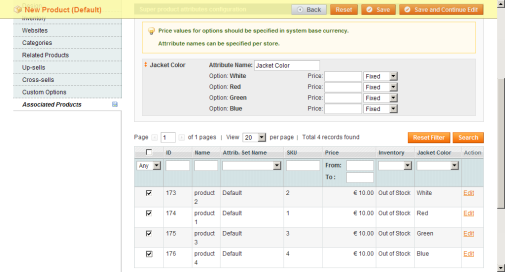
 k) Under associated products category, the simple products created must be associated with the 4 simple products in our case & save the configurable product.
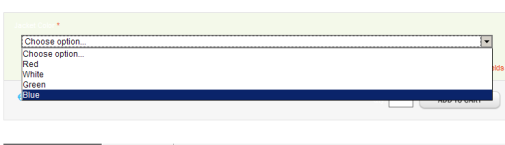
 l) On the front end the drop down menu from Jacket Color will now be displayed.
- Simple products with custom options (Recommended if you don’t plan to track inventory.)
- Configurable products and associate simple products to it. (Recommended if you plan to track inventory.)
1. Simple products with custom options:
a) Create Simple Product
b) Fill out all required fields such as: General, Price, Meta Information, Description, Inventory, Websites and Categories.
c) Create Custom Option
a) First you must create the attributes (make sure it can be used for configurable product)
To create an attribute log in your admin control panel select Catalogue => Manage Attributes => Create new attribute.
To manage the attribute set log in your admin control panel select Catalogue => Manage Attributes => Manage Attribute Set.
To create simple products log in your admin control panel select Catalogue => Manage Products => Create new product.
h) Once all simple products are done, we can create 1 configurable product for it.
Source
http://webshop-conversion.com/2009/07/24/how-to-create-configurable-products-in-magento/
Tuesday, March 15, 2011
Tuesday, March 8, 2011
Magento form validation, text validation, url validation
Most important thing besides assigning class names to form in magento is that little piece of JavaScript below the form. Remember to pass form id into the new VarienForm object.
Basically that’s it. Constructing the form this way, automatically makes your form reuse already existing validation code, the one that the rest of the shop is using.
Below is a full list of validate class and its error message that I found in prototype lib.
* validate-select
Please select an option.
* required-entry
This is a required field.
* validate-number
Please enter a valid number in this field.
* validate-digits
Please use numbers only in this field. please avoid spaces or other characters such as dots or commas.
* validate-alpha
Please use letters only (a-z or A-Z) in this field.
* validate-code
Please use only letters (a-z), numbers (0-9) or underscore(_) in this field, first character should be a letter.
* validate-alphanum
Please use only letters (a-z or A-Z) or numbers (0-9) only in this field. No spaces or other characters are allowed.
* validate-street
Please use only letters (a-z or A-Z) or numbers (0-9) or spaces and # only in this field.
* validate-phoneStrict
Please enter a valid phone number. For example (123) 456-7890 or 123-456-7890.
* validate-phoneLax
Please enter a valid phone number. For example (123) 456-7890 or 123-456-7890.
* validate-fax
Please enter a valid fax number. For example (123) 456-7890 or 123-456-7890.
* validate-date
Please enter a valid date.
* validate-email
Please enter a valid email address. For example johndoe@domain.com.
* validate-emailSender
Please use only letters (a-z or A-Z), numbers (0-9) , underscore(_) or spaces in this field.
* validate-password
Please enter 6 or more characters. Leading or trailing spaces will be ignored.
* validate-admin-password
Please enter 7 or more characters. Password should contain both numeric and alphabetic characters.
* validate-cpassword
lease make sure your passwords match.
* validate-url
Please enter a valid URL. http:// is required
* validate-clean-url
Please enter a valid URL. For example http://www.example.com or www.example.com
* validate-identifier
Please enter a valid Identifier. For example example-page, example-page.html or anotherlevel/example-page
* validate-xml-identifier
Please enter a valid XML-identifier. For example something_1, block5, id-4
* validate-ssn
Please enter a valid social security number. For example 123-45-6789.
* validate-zip
Please enter a valid zip code. For example 90602 or 90602-1234.
* validate-date-au
Please use this date format: dd/mm/yyyy. For example 17/03/2006 for the 17th of March, 2006.
* validate-currency-dollar
Please enter a valid $ amount. For example $100.00.
* validate-one-required
Please select one of the above options.
* validate-one-required-by-name
Please select one of the options.
* validate-not-negative-number
Please enter a valid number in this field.
* validate-state
Please select State/Province.
* validate-new-password
Please enter 6 or more characters. Leading or trailing spaces will be ignored.
* validate-greater-than-zero
Please enter a number greater than 0 in this field.
* validate-zero-or-greater
Please enter a number 0 or greater in this field.
* validate-cc-number
Please enter a valid credit card number.
* validate-cc-type
Credit card number doesn\’t match credit card type
* validate-cc-type-select
Card type doesn\’t match credit card number
* validate-cc-exp
Incorrect credit card expiration date
* validate-cc-cvn
Please enter a valid credit card verification number.
* validate-data
Please use only letters (a-z or A-Z), numbers (0-9) or underscore(_) in this field, first character should be a letter.
* validate-css-length
Please input a valid CSS-length. For example 100px or 77pt or 20em or .5ex or 50%
* validate-length
Maximum length exceeded.
http://www.magestore.com/blog/2010/04/09/form-validation-on-magento/
Sunday, March 6, 2011
Magento: How to select, insert, update, and delete data
CRUD (Create Read Update Delete)
Database table named ‘article‘
INSERT DATA
$data contains array of data to be inserted. The key of the array should be the database table’s field name and the value should be the value to be inserted.
$data = array('title'=>'test1,'content'=>'test2.','status'=>0);
$model = Mage::getModel('myarticle/myarticle')->setData($data);
try {
$insertId = $model->save()->getId();
echo "Data successfully inserted. Insert ID: ".$insertId;
} catch (Exception $e){
echo $e->getMessage();
}
SELECT DATA
$item->getData() prints array of data from ‘article’ table.
$item->getTitle() prints the only the title field.
Similarly, to print content, we need to write $item->getContent().
$model = Mage::getModel('myarticle/myarticle');
$collection = $model->getCollection();
foreach($collection as $item){
print_r($item->getData());
print_r($item->getTitle());
}
UPDAT
$id is the database table row id to be updated.
$data contains array of data to be updated. The key of the array should be the database table’s field name and the value should be the value to be updated.
// $id = $this->getRequest()->getParam('id');
$id = 2;
$data = array('title'=>'erewr','content'=>'dsfsdf','status'=>1);
$model = Mage::getModel('myarticle/myarticle')->load($id)->addData($data);
try {
$model->setId($id)->save();
echo "Data updated successfully.";
} catch (Exception $e){
echo $e->getMessage();
}
DELET
$id is the database table row id to be deleted.
// $id = $this->getRequest()->getParam('id');
$id = 3;
$model = Mage::getModel('myarticle/myarticle');
try {
$model->setId($id)->delete();
echo "Data deleted successfully.";
} catch (Exception $e){
echo $e->getMessage();
}
Subscribe to:
Posts (Atom)